0%

大数据隐私保护实验一

满昏

Lab-1

0x00 前言

本实验涉及技术要点如下

👉

👉

👉

👉

0x01 Socket Programming

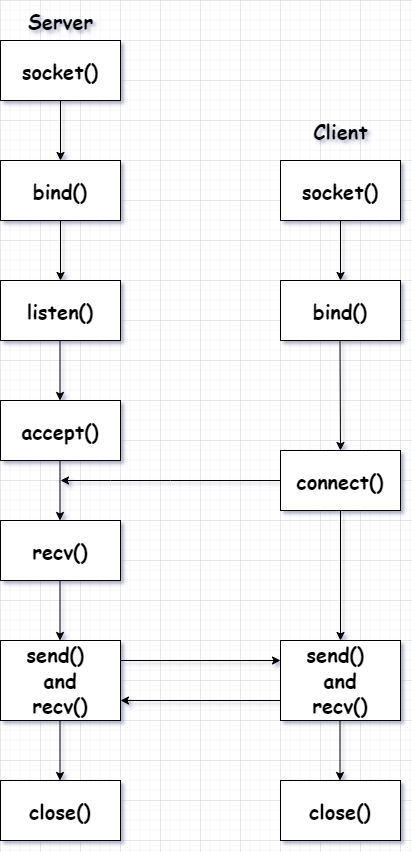
A socket is a communications connection point (endpoint) that you can name and address in a network. Socket programming shows how to use socket APIs to establish communication links between remote and local processes.

Sockets are commonly used for client and server interaction. Typical system configuration places the server on one machine, with the clients on other machines. The clients connect to the server, exchange information, and then disconnect.

A socket has a typical flow of events. In a connection-oriented client-to-server model, the socket on the server process waits for requests from a client. To do this, the server first establishes (binds) an address that clients can use to find the server. When the address is established, the server waits for clients to request a service. The client-to-server data exchange takes place when a client connects to the server through a socket. The server performs the client’s request and sends the reply back to the client.
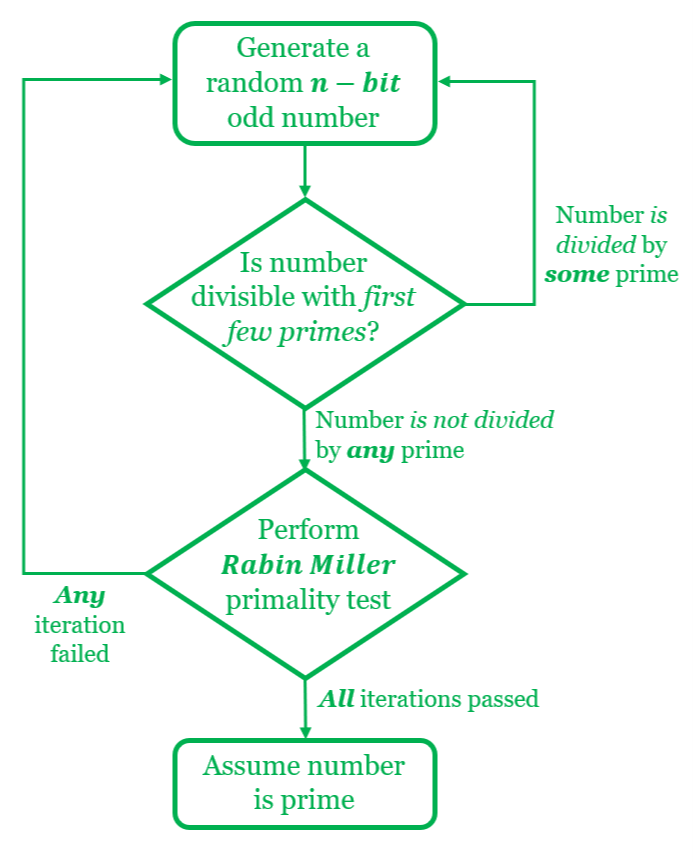
我们要做的是创建典中典的C/S模型,我们首先从服务器端开始看,因为服务器端相对复杂:

Server

1.初始化 socket()

socket() — Create Socket API

既然要连接,首先要有环境,那么我们要初始化socket,作为网络中的那一个一个小小的”点“(endpoint),并返回 socket descriptor

👋What is socket descriptor ?

我们知道文件有对应的 file descriptor,socket 函数就对应于普通文件的打开,socket descriptor 唯一标识一个 socket。

2.绑定端口 bind()

bind() — Set Local Address for Socket API

初始化好之后,服务器在等待客户端的连接请求,但是作为一个”点“,要想被客户端发现,这个点就要放到到的一个有名字的端口(可以理解为去西安北站候车室等高铁),所以我们要把一个 ipv4 或 ipv6地址族中的 特定地址 和 端口号 组合起来 bind() 到 socket 上。

3.侦听 listen()

listen() — Invite Incoming Connections Requests API

绑定端口后对端口进行监听 listen(),听有没有客户的连接请求。

4.阻塞 accept()

accept() — Wait for Connection Request and Make Connection API

但是服务器不能一直听,这太浪费资源了(太累了),为了更好地躺平为了更有效使用资源,我们要调用 accept() 进行阻塞,直到有客户端的连接请求(防止资源浪费在计算机系统中很常见,比如:微机原理 [键盘与 8255 结合应用] 中那4个二极管的作用:键盘扫描,为CPU节省资源

5.传输/接收 send() /recv()

客户端与服务器端成功建立连接,此时我们就可以调用各种 API 来传递或接收信息流,比如: send(), recv(), read(), write() 等。

send() — Send Data API

recv() — Receive Data API

6.关闭 close()

当客户端或者服务器有一个传完信息或者不想传时,直接 close() 来释放 socket 请求的资源。

close() — Close File or Socket Descriptor API

Client

客户端没有服务器端复杂,可以认为是服务器端实现过程的一个真子集。

1.初始化 socket()

2.绑定 bind()

3.请求连接 connect()

4.传输/接收 send()/ recv()

5.关闭 close()

👋如果不清楚就看看上面的图

C/S的本质

C和S都是进程,我们思考的是:进程在网络中如何通信。

要解决的问题是如何唯一标识一个进程,本地使用 PID 即可,但是网络中显然行不通。TCP/IP 协议中已经解决了这个问题,即:

· 网络层 ip地址,唯一标识网络主机

· 传输层 协议+端口,唯一标识主机进程

所以使用三元组就可以标识网络进程,网络的进程就可以用这个标志与其它进程交互。

0x02 Diffie-Hellman Algorithm

密钥交换是一种在公共通道上安全交换加密密钥的方法,即通过不安全通道建立共享密钥

是生成元,也是 的原根。

是两个随机数,满足

计算各自公开信息:

计算会话密钥:

0x03 Large prime number generation

  1. Preselect a random number with the desired bit-size

  2. Ensure the chosen number is not divisible by the first few hundred primes (these are pre-generated)

  3. Apply a certain number of Rabin Miller Primality Test iterations, based on acceptable error rate, to get a number which is probably a prime

1. Picking a Random Prime Candidate

生成 比特的随机数 取值范围是

我们选取如下范围的随机数

1
2
def nBitRandom(n):
return(random.randrange(2**(n-1)+1,2**n-1))

2. Low-Level Primality Test

低水平素数检验

需要先计算一部分素数。候选素数除以预先生成的素数以检查可除性。如果候选素数可以被这些预先生成的素数中的任何一个整除,则测试失败,我们必须重新挑选并测试新的候选素数。

1
2
3
4
5
6
7
8
9
10
11
12
13
14
15
16
17
18
19
# Pre generated primes
first_primes_list = [2, 3, 5, 7, 11, 13, 17, 19, 23, 29,
31, 37, 41, 43, 47, 53, 59, 61, 67,
71, 73, 79, 83, 89, 97, 101, 103,
107, 109, 113, 127, 131, 137, 139,
149, 151, 157, 163, 167, 173, 179,
181, 191, 193, 197, 199, 211, 223,
227, 229, 233, 239, 241, 251, 257,
263, 269, 271, 277, 281, 283, 293,
307, 311, 313, 317, 331, 337, 347, 349]

def getLowLevelPrime(n):
while True:
prime_candidate = nBitRandom(n)
for divisor in first_primes_list:
if prime_candidate % divisor == 0 and divisor**2 <= prime_candidate:
break
# If no divisor found, return value
else: return prime_candidate

3. Miller Rabin Primary Test (High-Level Primality test)

候选素数通过低级素数检验后要再一次被 Miller Rabin 素数测试 检验,由 CMU 的教授 Miller 首次提出,并由希大的Rabin教授作出修改,故称 Miller Rabin 素数测试

算法本质是一种 随机化算法 ,能在时间复杂度为 下快速判断一个数是否为素数,但有一定出错概率,此算法一次检验正确率约为 ,即误判概率 ,这是很保守的计算结果,实际使用的效果好得多 。通常在商业应用中,我们要求误判概率 小于

费马小定理

对于素数 ,若 不是 的倍数, 有

费马素数检验时间复杂度为 ,其中 为测试的次数。

费马小定理也有缺陷:

①费马小定理成立, 可能是素数;费马定理不成立, 一定不是素数 。

以内,费马素数检验的准确性尚可接受,但是涉及到一般在 64 位以上的大素数,出错的概率太高了,于是就有了基于 二次探测定理 改进的算法:

素数检验

二次探测定理

对于素数 ,若 ,则小于 的解只有两个:

定理证明:

易知

算法过程

给定一奇数 ,那么 必为偶数,令 ,随机选整数 , 有

判断是否为素数,首先检测 是否成立,若不成立,则 必不是素数。若成立,则 可能是素数,继续运行算法做进一步测试:

取整数 ,若存在 ,则 可能是素数;否则为合数。

1
2
3
4
5
6
7
8
9
10
11
12
13
14
15
16
17
18
19
20
21
22
23
24
25
26
27
28
29
30
31
32
33
34
35
36
37
38
39
def isMiller_Rabin_Test(p):
# 1. preparation
m = p-1 # p 奇 -> m 偶
q = 0

while m%2 == 0 :
# print("1") tested √
q += 1
m = m//2 # ÷2
# while 循环结束时满足如下条件
# p-1 = 2^q · m

assert(p-1 == 2**q * m)
tested = [] # 存放测试过的数据

# 2.算法开始
t = 20 # 20轮足够了
for _ in range(t):
composite = True
# picking a random integer -> a
a = random.randint(2,p-2)
while a in tested:
a = random.randint(2,p-2)
tested.append(a)
r = pow(a,m,p) # 快速模除
if r == 1 or r == p-1:
composite = False # 根据二次探测定理:如果满足if的条件,就是素数
else: # 再次判断
for j in range(1,q):
r = (r * r)%p
if r == p-1:
composite = False
break

if composite:
print( str(p) + " is Composite !")
return False
print( str(p) + " is Prime !")
return True

4. 代码实现

1
2
3
4
5
6
7
8
9
10
11
12
13
14
15
16
17
18
19
20
21
22
23
24
25
26
27
28
29
30
31
32
33
34
35
36
37
38
39
40
41
42
43
44
45
46
47
48
49
50
51
52
53
54
55
56
57
58
59
60
61
62
63
64
65
66
67
68
69
70
71
72
73
74
75
76
77
78
import random

first_primes_list = [2, 3, 5, 7, 11, 13, 17, 19, 23, 29,
31, 37, 41, 43, 47, 53, 59, 61, 67,
71, 73, 79, 83, 89, 97, 101, 103,
107, 109, 113, 127, 131, 137, 139,
149, 151, 157, 163, 167, 173, 179,
181, 191, 193, 197, 199, 211, 223,
227, 229, 233, 239, 241, 251, 257,
263, 269, 271, 277, 281, 283, 293,
307, 311, 313, 317, 331, 337, 347, 349]

def nBitRandom(n):
return(random.randrange(2**(n-1)+1, 2**n-1))

def getLowLevelPrime(n):
while True:
prime_generated = nBitRandom(n)

for divisor in first_primes_list:
if prime_generated % divisor == 0 and divisor**2 <= prime_generated:
break
else: return prime_generated

def isMiller_Rabin_Test(p):
# 0.
# if p < 3 or (p & 1 == 0):
# return p == 2

# 1. preparation
m = p-1 # p 奇 -> m 偶
q = 0

while m%2 == 0 :
# print("1") tested √
q += 1
m = m//2 # 右移做快速÷2
# while 循环结束时满足如下条件
# p-1 = 2^q · m

assert(p-1 == 2**q * m)
tested = [] # 存放测试过的数据

# 2.算法开始
t = 20 # 20轮足够了
for _ in range(t):
composite = True
# picking a random integer -> a
a = random.randint(2,p-2)
while a in tested:
a = random.randint(2,p-2)
tested.append(a)
r = pow(a,m,p) # 快速模除
if r == 1 or r == p-1:
composite = False # 根据二次探测定理:如果满足if的条件,就是素数
else: # 再次判断
for j in range(1,q):
r = (r * r)%p
if r == p-1:
composite = False
break

if composite:
print( str(p) + " is Composite !")
return False
print( str(p) + " is Prime !")
return True

if __name__ == '__main__':
while True:
n = 1024 # 生成1024位大素数
p = getLowLevelPrime(n)
if not isMiller_Rabin_Test(p):
continue
else:
print(n, "bit prime is: \n",p)
break

测试成功!

5. largePrime.py文件构造

1
2
3
4
5
6
7
8
9
10
11
12
13
import random

first_primes_list

def nBitRandom(n):

def getLowLevelPrime(n):

def isMiller_Rabin_Test(p):

def getGenerator(n):

def getLargePrime(n):

其中getGenerator()getLargePrime(n)是对上面三个函数的封装:

1
2
3
4
5
6
7
8
9
10
11
12
def getGenerator(n):
return( nBitRandom(n) )

def getLargePrime(n):
while True:
p = getLowLevelPrime(n)
if not isMiller_Rabin_Test(p):
continue
else:
print(n, "bit prime is: \n",p)
break
return p

0x04 client_File.py

1. 前期准备

1
2
3
4
5
6
7
import os
import random
import socket
import largePrime

SEPARATOR = "<SEPARATOR>" # 分割数据
BUFFER_SIZE = 1024*1024*2 # 缓冲区

为了更有效率地观察文件实时传输的情况,我们使用 tqdm 进度条库,首先要使用 pip3 安装

1
pip3 install tqdm

导库并创建进度条

1
2
3
4
5
6
import tqdm
progress = tqdm.tqdm(range(filesize),
f"Sending {filename}",
unit="B",
unit_scale=True,
unit_divisor=1024)

👋如果想详细了解 tqdm 库的使用请出门右转:tqdm document

下一步我们要确定 IP 地址、我们要连接到的端口 和 我们要发送的文件

1
2
3
4
5
6
7
8
host = "127.0.0.1"

port = 5004

filename = "test.txt"
# 确保 filename 和 client_File.py 在同一路径下
filesize = os.path.getsize(filename)
# 获取文件字节数,为后续传输和显示进度做准备

👋要记住一些常用端口号

HTTP : 80/8080/3128/8081/9080
HTTPS : 443/tcp 443/udp
FTP : 21
Telnet : 23

2. 建立TCP连接

1
2
3
4
s = socket.socket()
print(f"[+] Connecting to {host}:{port}")
s.connect((host,port))
print(f"[+] Connected.")

3. DH密钥交换 与 AES

1
2
3
4
5
6
7
8
9
10
11
12
13
14
15
16
17
18
19
20
21
22
23
24
25
26
27
28
29
30
31
32
33
34
35
36
37
38
39
40
41
42
43
44
45
46
47
# 大素数生成
q = (str) (largePrime.getLargePrime(256))
# print('large_prime= \n ' + (str)(q))
# q 测试 √
s.send(q.encode('utf-8'))

# 生成元
g = (str) ( largePrime.getGenerator(6) )
print("g=",g)
s.send(g.encode('utf-8'))
g = (int) (g)
# g 测试 √

# 发给server的数 a
a = (str)(random.randint(100,1024))
print("a=",a)
s.send(a.encode('utf-8'))
a = (int) (a)

# 收到server的数 b
b = s.recv(BUFFER_SIZE).decode()
b = (int) (b)
print("Client recv b=",b)

# 计算cilent自己的公开信息并发送
Y_a = pow(g,a,int(q))
print("Y_a = ",Y_a)
Y_a = (str)(Y_a)
s.send(Y_a.encode('utf-8'))
# Y_a 测试 √

# 接收server的公开信息
Y_b = s.recv(BUFFER_SIZE).decode()
print("Client recv Y_b=",Y_b)
# 测试√

# 快速模除求分配密钥
K_a = pow((int)(Y_b),(int)(a),(int)(q))
print("K_a = ",K_a)
K_a = (str)(K_a)
# 测试√ K_a = K_b,密钥分配完成

# 此处从密钥中选取32位作为临时加密密钥,为后续AES加密铺垫
key = K_a[1:33]
print("key => " , key)
s.send(key.encode('ISO-8859-1'))
key = key.encode('ISO--8859-1')

👋为什么使用 ISO-8859-1 编码

调试时发现一个 bug :

1
2
3
4
key.encode('utf-8')

UnicodeDecodeError: 'utf-8' codec can't decode byte 0xe3 in position 1: invalid start byte
Unicode解码错误:“utf-8”编解码器无法解码位置1的字节0xe3:无效的起始字节

解决方法:

1
key.encode('ISO--8859-1')

codecs.encode(obj, encoding=’utf-8’, errors=’strict’)

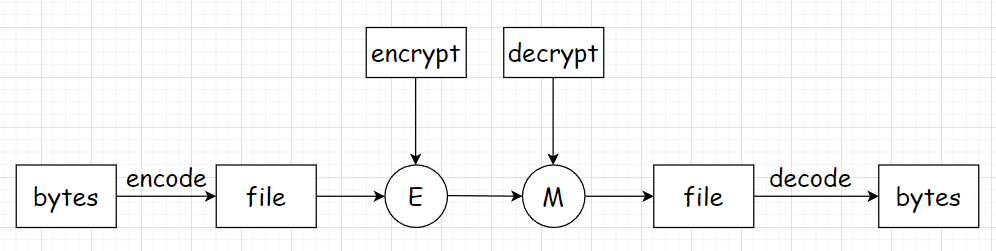
Encodes obj using the codec registered for encoding.

Errors may be given to set the desired error handling scheme. The default error handler is 'strict' meaning that encoding errors raise ValueError (or a more codec specific subclass, such as UnicodeEncodeError). Refer to Codec Base Classes for more information on codec error handling.

codecs.decode(obj, encoding=’utf-8’, errors=’strict’)

Decodes obj using the codec registered for encoding.

Errors may be given to set the desired error handling scheme. The default error handler is 'strict' meaning that decoding errors raise ValueError (or a more codec specific subclass, such as UnicodeDecodeError). Refer to Codec Base Classes for more information on codec error handling.

创建 AES 对象

1
2
from Crypto.Cipher import AES
aes = AES.new(key,AES.MODE_ECB)

👋关于ECB模式

ECB(Electronic Codebook Book)

将整个明文分成若干段16字节长小段,然后对每一小段进行加密

那么问题来了,如果不够16字节怎么办?那就在字节型的数据后添加 '0' 便于加解密和服务器端获取内容。

1
2
3
4
5
6
7
8
9
def add_2_16(value):
length = len(value)
count = length

while(count % 16 != 0):
value += '0'
count += 1

return value

4. 发送文件

DH密钥交换完成的前提下,先给服务器端发送文件名和文件大小

1
s.send(f"{filename}{SEPARATOR}{filesize}".encode('ISO-8859-1'))

发送文件的代码框架:

1
2
3
4
5
6
7
8
9
以二进制读方式打开文件 :
while True:
从缓冲区读内容
if 没有 从缓冲区中读到的内容 :
break 跳出循环
对读取的内容加密
socket 发送加密内容
更新 进度条状态
发送完文件后关闭socket

对于文件读取这种 事先需要设置;事后做清理工作的场景,选用 with 语句是非常方便的处理方式。

首先获取文件描述符(虽然在 windows 环境下叫句柄(handle),但是句柄太难听了,不如直接叫 文件描述符),从文件中读取数据,最后关闭文件描述符。

如果不使用 with 语句,示例代码如下:

1
2
3
file = open("test.txt")
data = file.read()
file.close()

当然,上面的代码只是单纯实现了要求的功能,没有考虑可能存在的问题:

1.忘记关闭文件描述符

2.文件读数据异常

3.文件写数据异常

所以引入处理异常后代码如下:

1
2
3
4
5
file = open("test.txt")
try:
data = file.read()
finally:
file.close()

这段代码运行很好,但有点冗长,此时 with 语句就体现出了优势:

1
2
with open("test.txt") as f:
data = f.read()

👋with 的本质是在上下文管理器中封装 try…finally来简化异常。

所以使用with打开我们需要的文件:

1
2
3
4
5
with open(filename, "rb") as f:
while True:
bytes_read_f = f.read(BUFFERSIZE)
if not bytes_read_f :
break

既然是传加密文件,那么我们就要对文件内容加密,我使用的是 AES 算法里的 ECB 模式。

1
2
3
4
5
6
7
8
9
10
11
12
13
14
15
16
17
# 首先把读到的 bytes 类型数据转为 string 类型
bytes_read_2str = str(bytes_read_f)
# ECB是分组加密,每组 16 字节 (128位),后面补 '0'
bytes_read_2str = add_2_16(bytes_read_2str)
# 开始加密,为避免 utf-8 编解码错误,使用 ISO-8859-1
bytes_read_o = aes.encrypt(bytes_read_2str.encode('ISO-8859-1'))

# 为了便于调试和验收,建议此处放置 print() 来查看
print(" byte_before_crypted => ",bytes_read_f)
print(" byte_read_crypted => ",bytes_read_o)

# 客户端发送加密数据
s.sendall(bytes_read_o)
# 更新状态栏
progress.update(len(bytes_read_f))
# 关闭socket
s.close()

0x05 server_File.py

1. 前期准备

1
2
3
4
5
6
import os
import tqdm
import random
import socket
from urllib import parse
from Crypto.Cipher import AES

定义 IP地址 、端口号 、 缓冲区大小、分隔符

1
2
3
4
SERVER_HOST = "0.0.0.0"
SERVER_PORT = 5004
BUFFER_SIZE = 1024*1024*2
SEPARATOR = "<SEPARATOR>"

2. 建立TCP连接

1
2
3
4
5
6
7
8
9
# 建立 TCP 连接
s = socket.socket()
s.bind((SERVER_HOST,SERVER_PORT))
# 10 -> 最大允许连接数
s.listen(10)
print(f"[*] Listening as {SERVER_HOST}:{SERVER_PORT}")
# 允许连接
client_socket, address = s.accept()
print(f"[+] {address} is connected.")

3. DH密钥交换 与 AES

1
2
3
4
5
6
7
8
9
10
11
12
13
14
15
16
17
18
19
20
21
22
23
24
25
26
27
28
29
30
31
32
33
34
35
36
37
38
# 开始DH密钥交换
recv_q = client_socket.recv(BUFFER_SIZE).decode()
print("Server recv q = ",recv_q)
recv_q = (int)(recv_q)

# 生成元
recv_g = client_socket.recv(BUFFER_SIZE).decode()
print("Server recv g = ",recv_g)
recv_g = (int)(recv_g)

# 对方的a
recv_a = client_socket.recv(BUFFER_SIZE).decode()
print("Server recv a = ",recv_a)
recv_a = (int)(recv_a)

# 自己的b
server_send_b = (str)( random.randint(100,1024) )
print("server_send_b = ",server_send_b)
client_socket.send(server_send_b.encode('utf-8'))
# 成功发送
server_send_b = (int)(server_send_b)
Y_b = pow(recv_g,server_send_b,int(recv_q))
print("Y_b = ",Y_b)
Y_b = (str)(Y_b)
client_socket.send(Y_b.encode('utf-8'))
# 测试√

Y_a = client_socket.recv(BUFFER_SIZE).decode()
K_b = pow((int)(Y_a),(int)(server_send_b),(int)(recv_q))
print("Y_a = ",Y_a)
print("K_b = ",K_b)
# 测试√ K_a = K_b,密钥分配完成

de_key = client_socket.recv(BUFFER_SIZE).decode('ISO-8859-1')
print("dekey => ",de_key)
de_key = de_key.encode('ISO--8859-1') # --> bytes

aes = AES.new(de_key,AES.MODE_ECB)

4. 接收文件

1
2
3
4
5
6
7
received = client_socket.recv(BUFFER_SIZE).decode('ISO-8859-1')
filename, filesize = received.split(SEPARATOR)
# 若有路径名,则去除路径
filename = os.path.basename(filename)
filesize = int(filesize)
# 更新状态栏
progress = tqdm.tqdm(range(filesize), f"Receiving {filename}", unit="B", unit_scale=True, unit_divisor=1024)

接收文件代码框架:

1
2
3
4
5
6
7
8
以二进制读方式打开文件 :
while True:
从缓冲区读内容
if 没有 从缓冲区中读到的内容 :
break 跳出循环
对读取的内容解密
更新 进度条状态
关闭socket

对于解密这一步骤,要注意的点很多

整个流程是:

所以要先解密,再解码。

1
2
3
4
5
6
7
8
9
10
11
12
13
14
15
16
17
18
19
20
21
22
23
24
25
26
27
28
with open(filename, "w",encoding='utf-8') as f:
while True:
bytes_read_crypted = client_socket.recv(BUFFER_SIZE)
bytes_read = aes.decrypt(bytes_read_crypted)
bytes_read = bytes_read.decode('utf-8')

if not bytes_read_crypted:
break
res = bytes_read
ans = bytes_read.encode()

# 取两个 ' 之间的内容
start_position = bytes_read.find("'",1)
end_position = bytes_read.find("'",2)
# print("start_position = ",start_position)
# print("end_position = ",end_position)
res = res[(start_position+1):end_position]
# print(" res = ",res)

res = res.encode('unicode_escape')
res2 = res.decode('utf-8').replace(r'\\\\x','%')
res3 = parse.unquote(res2)
res3 = res3.replace(r'\\\\r\\\\n','\\n')
# 把 \\r和\\n 转换为真正的回车换行,否则会显示 \r\n
print(" res = ",res3)
# 上面针对中文字符做了 replace 和 unquote 处理
f.write(res3)
progress.update(filesize)

服务器端代码针对中文字符做了 replaceunquote 处理。

0x06 实验结果

0x07 References

Socket Programming - IBM v 7.1

How to generate Large Prime numbers for RSA Algorithm

THE MILLER–RABIN TEST

python编码报错:UnicodeDecodeError

codecs—Codec registry and base classes

Python pycrypto: using AES-128 in ECB mode

关于\x开头的字符串编码转换中文解决方法

后记

本实验已上传至 github个人学术博客

-------------本文结束感谢您的阅读-------------
请作者喝一杯蜜雪冰城吧!